The 121B is a Chinese Tier X medium tank in World of Tanks—a polished, more competitive take on the classic 121. It’s tied to high-level competitive rewards: you’ll only see it on accounts that put time into the WoT Maneuvers ecosystem. This guide breaks down what it actually does in battle—armor, gun, vision, crew setup—and how to squeeze value out of the platform.
Note: Acquisition rules and map seasons change. Double-check the current campaign window and requirements in-game before you grind for the 121B.

On this page
- 121B core characteristics
- Firepower & gun handling
- Survivability & positioning
- Mobility & spotting
- Recommended equipment
- Crew skills & perks
- Consumables
- Verdict
121B core characteristics
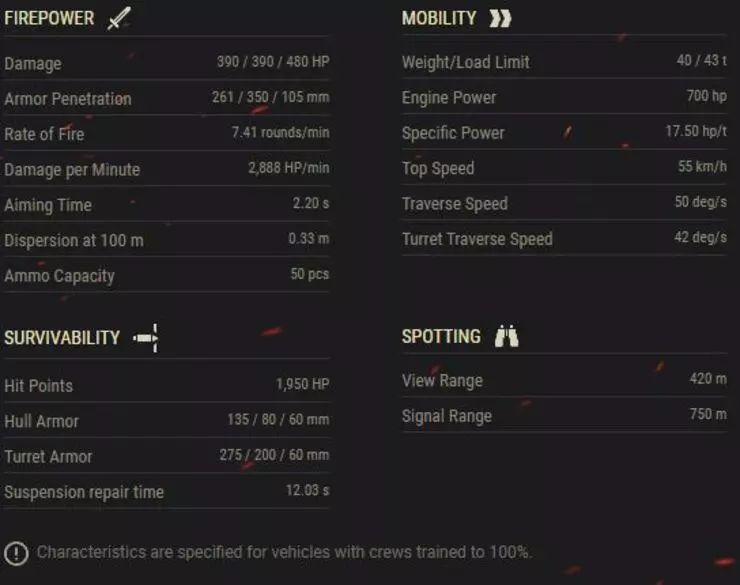
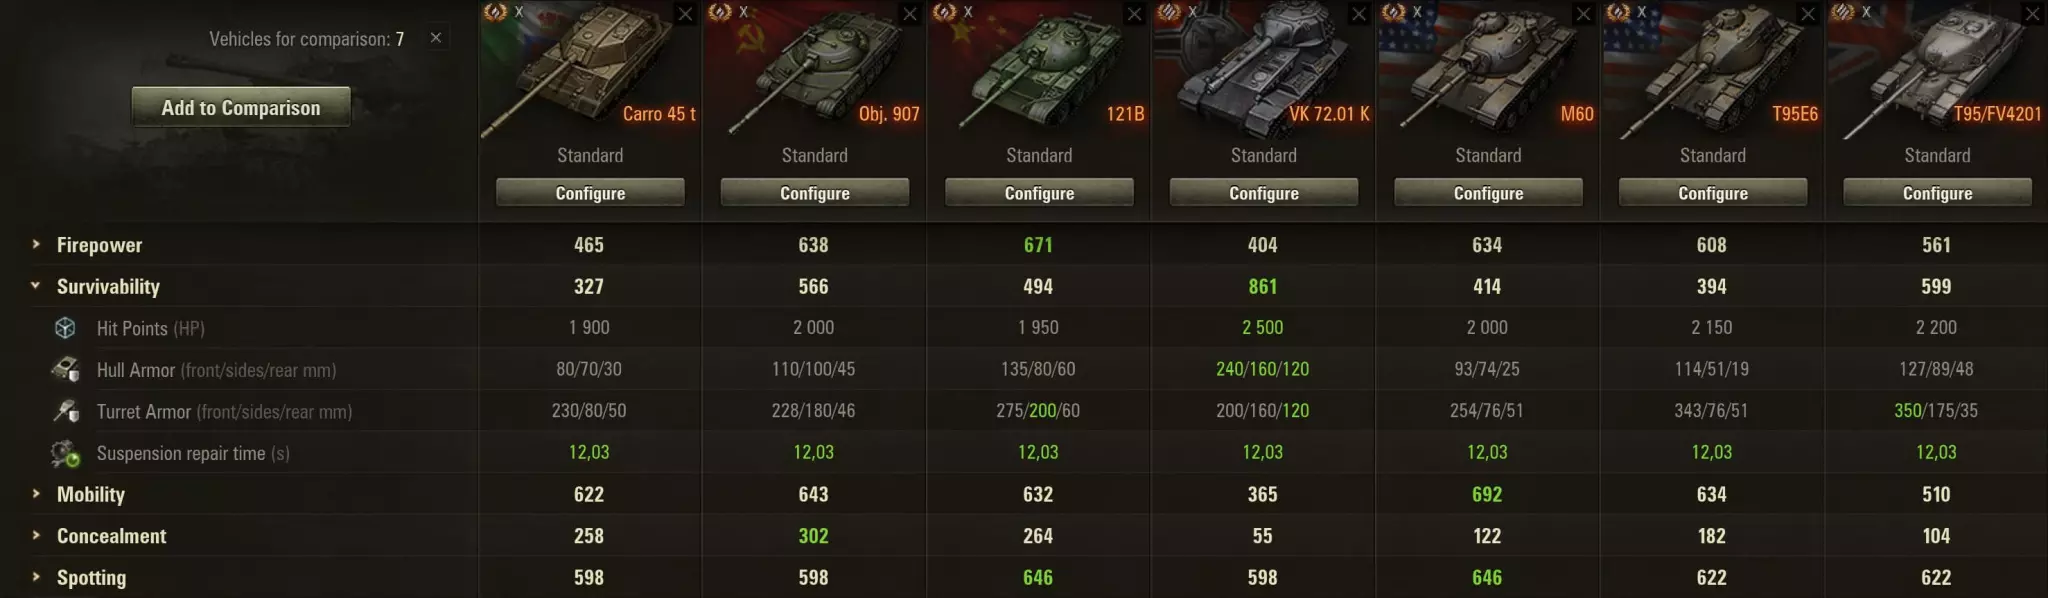
Let’s start with the chassis: 1,950 HP is mid-pack for Tier X mediums. For context, that sits between something like the T-22 medium at 1,900 and the T95E6 at 2,150—so you’re not paper, but you’re also not a super-heavy HP brick.
Hull armor is 130 / 80 / 60 mm; the turret is 240 / 160 / 60 mm. The turret profile is the star here, while the hull gains a small thickness bump over the stock 121. It’s not a revolution, but combined with shape and angling it can bail you out against sloppy shots.
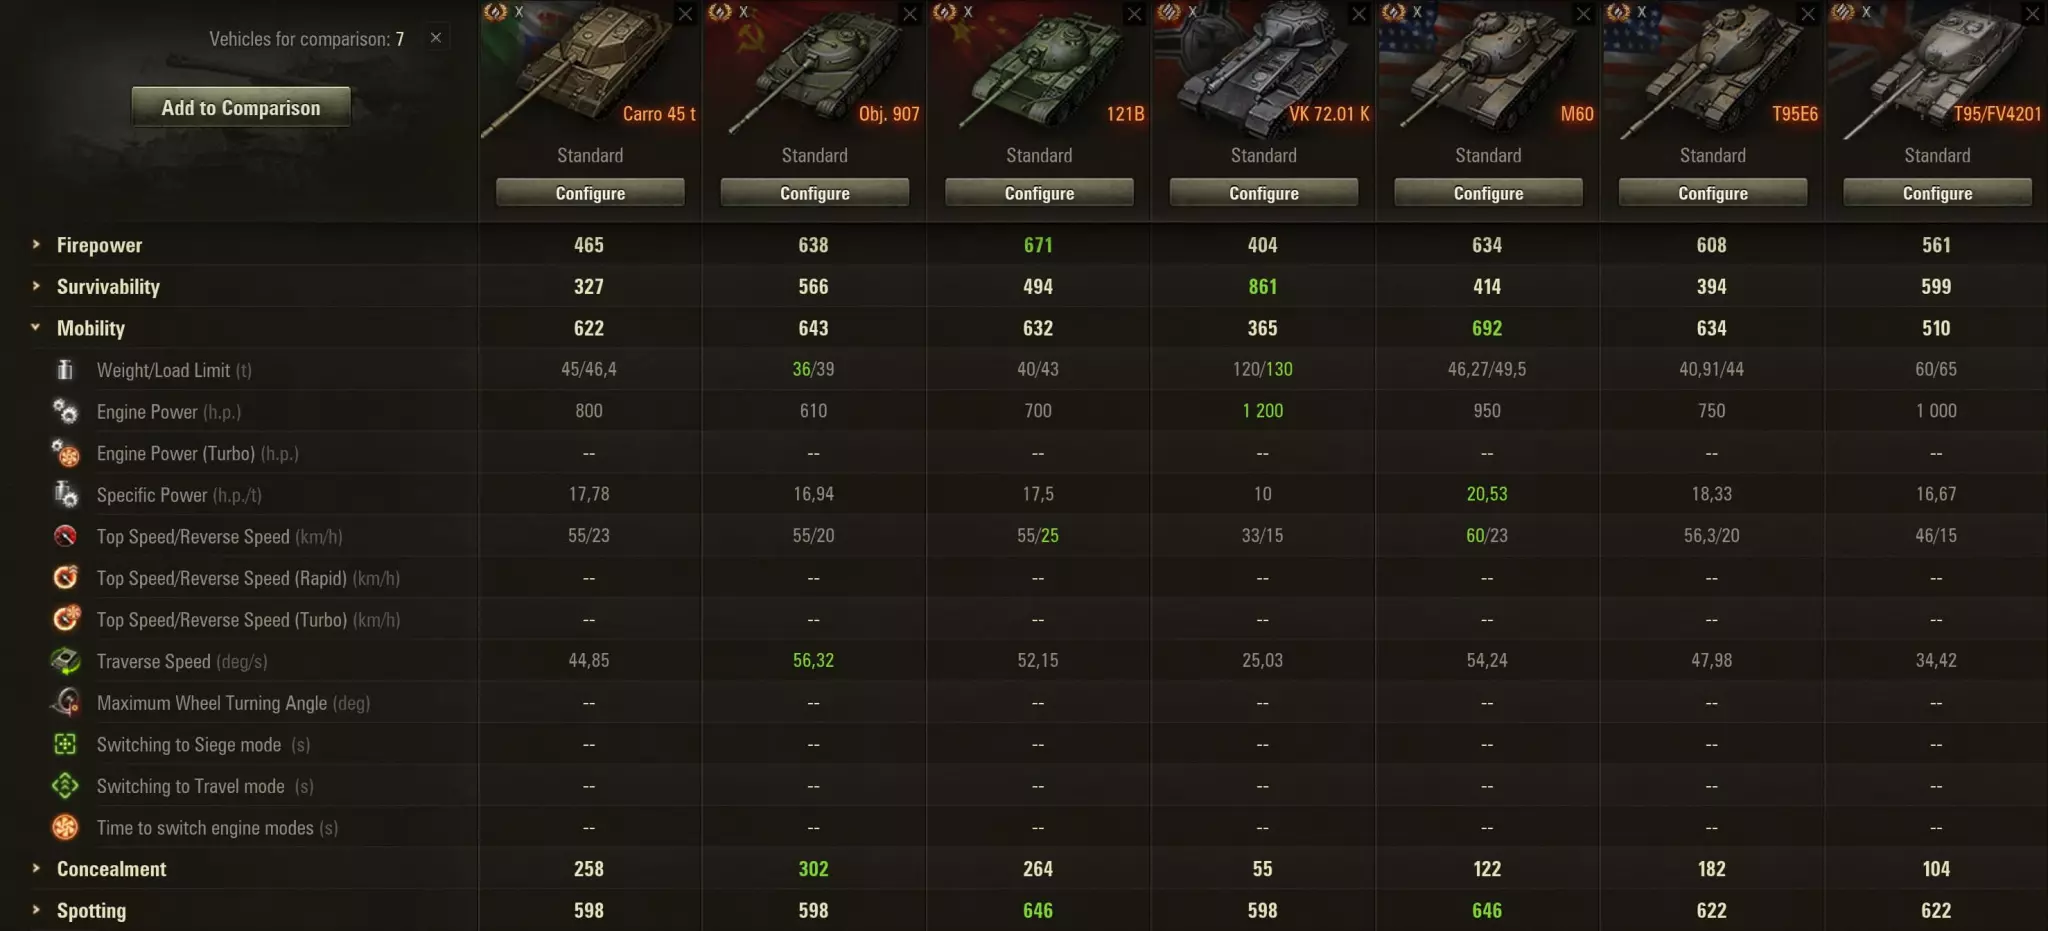
Weight is 40–43 t (configuration-dependent) with a 700 hp engine—roughly 17.5 hp/t specific power. That’s workable, but plenty of peers will feel peppier on soft terrain or off the line.
Top speed caps at 50 km/h, hull traverse is 50°/s, and turret traverse is 42°/s. Net result: a medium that can rotate fights and snap guns onto new angles without feeling like a slug.
Base view range is a highlight at 420 m—and you can push it higher with crew, equipment, and food. That’s a big reason the 121B can flex between dealing damage and helping the team light.
Important: Gun depression is only −5° / +18°. Ridge wars and awkward crests will punish you—plan positions where you don’t need NATO levels of gun drop.
Firepower & gun handling
The 121B’s weapon isn’t a copy-paste 121 gun. Alpha sits at 390 / 390 / 480 (AP / APCR / HE), with penetration 261 / 350 / 105 mm. That’s comfortable Tier X APCR for dealing with superheavies without feeling helpless.
Rate of fire and shell handling stack up nicely: expect around 2,689 DPM in a typical setup, 2.20 s aim time, and 0.33 m dispersion at 100 m. You’re not always #1 in raw DPM among mediums, but you’re absolutely in the top tier for “reliable damage per minute + accuracy.”

Survivability & positioning
Good 121B play is about remembering what you’re not: you’re not a hull-down king with −10 depression, and you’re not a flanker with broken mobility. You are a turret-heavy, accurate DPM platform that likes controlled trades.
You can work second-line ridgelines, play support behind heavies, or step up when the minimap opens—just never forget your sides and lower plate. If you drive flat into a crossfire, the HP pool won’t save you.
One of the cleanest patterns: leverage gun handling + DPM from bushes at medium range, break aim, then reposition. That playstyle sidesteps depression pain (you’re not constantly peeking weird crests) and lets accuracy do the heavy lifting.
Mobility & spotting
Mobility
The 121B is “fast enough” for medium work: enough top speed to relocate, enough traverse to brawl in a pinch. You’re not a CS-63 racing for early spots—but you’re also not anchored to one lane all game.
View range & vision play
With 420 m base view range, the 121B can realistically contribute to vision in late-game phases or when your team lacks a dedicated light. Stack crew skills and equipment if you want to lean into that role—but don’t throw away HP trying to be a passive scout on Prokhorovka unless the lineup actually supports it.

Recommended equipment
Classic medium trio: pump DPM, tighten dispersion, then buff the whole crew.
| Slot | Equipment | Why it fits |
|---|---|---|
| 1 |
Gun Rammer |
More shells per minute—your gun is already strong; this makes it unfair in sustained trades. |
| 2 |
Vertical Stabilizer |
Less bloom on the move—huge for peek-and-chip play at medium range. |
| 3 |
Improved Ventilation |
Small buff to everything the crew touches—gun, vision, mobility. |
Tip: If you prefer more vision over raw comfort, experiment with replacing Vents with a vision-focused piece in slot 3—but only if you understand the trade-off in gun consistency.
Crew skills & perks
Order matters early: grab survival and gun basics first, then stack Brothers in Arms once every crew member has their first skill at 100%.
| Role | 1st | 2nd | 3rd | 4th | 5th |
|---|---|---|---|---|---|
| Commander |
 Sixth Sense |
Repairs |
 Brothers in Arms |
 Situational Awareness |
 Eagle Eye |
| Gunner |
Repairs |
 Snap Shot |
Brothers in Arms |
Camouflage |
Firefighting |
| Driver |
Repairs |
 Smooth Ride |
Brothers in Arms |
Camouflage |
Firefighting |
| Loader |
Repairs |
 Safe Stowage |
Brothers in Arms |
Camouflage |
Firefighting |
Consumables
| Slot | Item | What it does |
|---|---|---|
| 1 |
Large Repair Kit |
Effect: repairs all damaged modules; +10% repair speed for the whole battle (even if unused). Cooldown: 90 s. Consumed after battle if used once. Cost: 20,000 credits. |
| 2 |
Large First Aid Kit |
Effect: heals all injured crew; −5% stun duration and +15% crew injury resistance for the battle (even if unused). Reusable with cooldown. Cooldown: 90 s. Consumed after battle if used once. Cost: 20,000 credits. |
| 3 |
Improved Combat Rations |
Effect: +10% to all crew skills until the end of the battle. Expended every match. Cost: 20,000 credits per battle. |
Verdict
The 121B is a flexible, accurate Tier X medium with a serious gun and enough vision to matter. Its main homework is positional: respect the gun depression, abuse the turret when you can, and let DPM do the talking from ranges where you’re hard to punish.
Need help grinding Global Map rewards or campaign milestones? Boost Hub’s experienced players can speed up the path to tanks like the 121B while you keep control of your account.
See World of Tanks Maneuvers services →